Search This Blog

Thursday, May 23, 2013

Create Nursery Labels ~ Organize!


Use Labels and Tags to Organize with Flair


Babies have a lot of stuff! Here's a fun way to organize in the nursery. Create labels for your boxes, bins and crates. All you need is either some card stock or sticker paper, a graphics program, a printer and your imagination! If you choose card stock, you will also need a hole puncher and something to attach your labels like Velcro tabs, ribbon, twine or metal rings plastic linking rings. To insure durability, you'll also want to laminate the labels. I really like the Self-Sealing Laminating Pouches from Scotch. No machine is needed for laminating when using the pouches.

Let's get started. Open your graphics program. I used Paint Shop Pro 7.  Create a new image 252 w x 180 h with a white background. Create your own graphic or add clipart. I used a drop shadow around the graphic for a bit of depth.  Now add some text. I used Broadway font also with a drop shadow. Merge all of your layers. I used the buttonize effect and of course, the drop shadow. The last thing I did was to add a border. I used a size 1.


Booties label

Binkys Label

Hair Bows Label


Red Binkys Label

                                Thanks to Webweaver's Free Clipart
                                 for the red binky graphic.

Shoes Label

Toys Label

Here are a few more labels I made. 

Wood Grain Hats Label


Wood Grain Toys Label

The wood grain labels were created using a wood grain texture and a chisel effect. Flood fill your white image with a wood grain texture. Insert your text. Flood fill the text with the same wood grain texture. Use the chisel effect (transparent option). The "Hats" label was made using the chisel effect twice. I finished them off using the buttonize effect and a black border.

Toys With Road Signs Background Label


This last label was created by placing small images onto the white background. I used the Paint Shop Pro picture tube tool. I merged the images into one layer and faded them. For the last layer, I chose the rounded edge rectangle and flooded it with white. Next I added my text and finished it off the same as the other labels.


Decide upon  the look you'd like. Experiment with fonts, colors and shapes, too. You could make some oval labels. Oooooh! Just had another idea! You could scan a bit of your patterned nursery fabric into the computer. Then, you could use that image as a background  for your labels!

One last thought: If you don't have a graphics program, try card stock (heavy weight paper), scrapbook paper and scrapbook embellishments. You can find these things at a craft store.  Have fun! Be creative!!

If you do some labels, share them with us here! It's always fun to see how others tweak an idea or change it entirely!


Thursday, May 16, 2013

DIY Nursery Wall Decor


A nursery is special. It's a home for your baby. You chose a wall color, pick out furniture and bedding for the crib. But you don't stop there when you want to really personalize this space. Those blank walls are the perfect opportunity for you to express your love and creativity! Itching to get started but not sure what to do? Check out these ideas!

Frame Your Fabric
                                  See more great ideas from Katrina
                                           at Splash of Something.


Stenciled Wall
                                    See more great ideas from Sarah
                                            at Cozy. Cottage. Cute.


Pinwheel Art
                                    See more great ideas from Kelly
                                           at View Along The Way.
                                 You can find Kelly on Facebook, too!


Nursery Mural
                               See more great ideas from Suzanne
                         at SMALLCHANGES BIGIMPROVEMENTS.


Faux Mosaic Tiled Letters

                                 See more great ideas from Marzi
                                           at Made By Marzipan.
                                         Check out her Etsy Store


DIY Wall Art: Bubbles

                                    See more great ideas from Sara
                                          at MR. HANDSOMEFACE


Decoupage Tree
                   Find the Decoupage Tree tutorial at project nursery.
                                   See more great ideas from Katy                      
                                                at CADEN LANE.


DIY: No Sew Bunting Flags

                 Find the No Sew Bunting Flags tutorial at project nursery.
                  This nursery project is also from Katy at CADEN LANE.


DIY: Clothing Art for the Nursery
           Think about baby's going home outfit or baby's 1st portrait outfit.                         Find the Clothing Art tutorial at project nursery.
               See more great ideas from Morgan at Pepper Design Blog.


Embroidery Hoop Nursery Decor
                      See more great ideas from Caroline at Armelle.
                         Also check out her store, Armelle the shop.


 Themed and Framed Nursery Art
               See more great ideas from Ashley at Little Miss Momma.


Birth Stats Art
               See more great ideas from Tam at sew dang cute crafts.


Shadow Boxes
                     This idea is also from Tam at sew dang cute crafts.
                        Check out Tam's store, THE CHIC ORCHID.


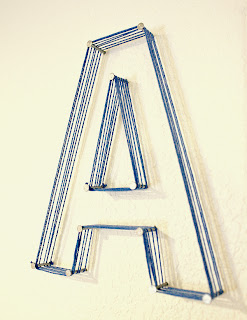
DIY: Nail and String Letters
You could also add a small toy inside each letter such as a plush alligator  for "A" and a block or ball for "B".
See more great ideas from Jen at jk jk.
Check out Jen's Etsy Store.


Here's one more idea for you to consider. If your baby has siblings, frame some of their artwork for the nursery. It's a wonderful way for brothers and sisters to welcome the newest member of the family.
                                                  Idea Source

How have you decorated your baby's nursery wall?  Did these ideas inspire you? Did you do something totally different that you'd like to share with us?  Let's hear from you!


Friday, May 10, 2013

Free Printable Bookplates for Baby


Family Bonding With a Book

Without a doubt, one of the best and most important gifts you can give a baby is books. There are all kinds of books for baby. There are soft fabric books, vinyl bath books, block books, board books and hardback books. Create a "Baby's First Library" gift! Collect a few books of each type. Place them inside a small plastic tub with tissue paper and gift basket paper shred. You might even want to add some weighted bottom plush toys or stacked baby blocks as bookends. To make the hardback books a little more special, personalize them with bookplates.

Here are some free printable bookplates! The bookplates measure 3 ¼ in x 2 ¼ in. I was able to get 8 on a page by going to "Page Layout", "Margins", "Narrow".

Ready to Print!

Ready to save and print some bookplates? Click on each bookplate choice and save to your computer. Go to Word and insert each image onto your Word page.  Place sheets of sticker paper (found in craft or office supply stores) inside your printer according to the package directions. Then, print!

Bear Family Bookplate

ABC Bookplate

Basketful of Books Bookplate

Udderly Fun Bookplate

Goose Bookplate

Frog Bookplate

Giraffe Bookplate

Rocking Horse Bookplate

Open Book Bookplate

Baby's Toys Bookplate

If you have a graphics program, you can add the baby's name in any font or text color.

Enjoy!


Friday, May 3, 2013

Free Baby Food Recipe Cards

Baby shower gifts usually consist of lots of infant items. That's great, but have you ever thought about later on? No, I don't mean right after the shower's over. I'm talking about how the parents are going to have to buy more and more and more stuff because babies grow so quickly! Sometimes, I like to include things in a shower gift like onesies, socks, pacifiers and toys made for babies older than 3 mo. These are items that can be used regardless of the gender, season or personal taste of the parents.

With that thought in mind, how about including some homemade baby food recipes? I have some free recipe cards for you! You can create a gift with blank cards tied with ribbon for the mom-to-be to add her own recipes, recipe cards filled in by you with homemade baby food creations, a few bibs, a few spoons and a baby food freezer tray or cubes. Package the items in either a cute recipe box or a small plastic bin. Place everything inside a large cellophane treat bag and tie off with a pretty bow and enclosure card. Voila! Cute thoughtful gift!

The images (recipe cards) are 4 ½ in x 6 ½ in. This may be too large. This was necessary to maintain the details on the cards. You can resize the cards on your copier. Get your baby food recipe cards!

Step 1: Right click and save the image to your computer. To view a larger image, click on each recipe card below.
Step 2: Print your image (recipe card) on cardstock, if the image is the appropriate size for you. If not, print onto computer paper. Now place your image (recipe card) on your copier and resize the image. You may want to print on computer paper again to be sure you have the right sizing. When you are satisfied, print it onto cardstock. Once you have the right sizing, you can print out multiple cards!!

Rainbow Baby Food Recipe Card


Bib and Bottle Baby Food Recipe Card

Confetti Baby Food Recipe Card

Stork  Baby Boy Food Recipe Card

Stork Baby Boy Food Recipe Card 2

Stork Baby Girl Food Recipe Crad

Stork Baby Girl Food Recipe Card 2

Just had a great idea! Suggest to mom that she record the first time her baby tries each recipe. Just flip the card over and write in the name of the baby, the date and his/her reaction to the new taste.

Ding! Another idea! Suggest that mom place the card inside her baby's scrapbook when the her baby has outgrown that recipe.

For websites with some tasty homemade baby food recipes, check out my Pinterest board Homemade Baby Food.